Acquiring an SD Card with FTK Imager
Forensic acquisition lab: imaging an SDHC card to E01 with FTK Imager, splitting the image into segments, and verifying the MD5 and SHA1 hashes before analysis.
Objective
The objective of this practical is to create a forensic image of an SD card using Exterro FTK Imager 8.2.0.26. Instead of performing recovery directly on the original SD card, a forensic image is created first so that further analysis and deleted-file recovery can be carried out on a copy of the evidence.
The acquired image is stored in E01 (Expert Witness Format) and verified using MD5 and SHA1 hashes to confirm that the acquisition was completed successfully and that the image data remained consistent.
Tool and Evidence Information
| Item | Details |
|---|---|
| Tool | Exterro FTK Imager 8.2.0.26 |
| Evidence source | SDHC removable storage device |
| Source type | Physical |
| Source size | 29,844 MB |
| Sector count | 61,120,512 |
| Bytes per sector | 512 |
| Image format | E01 |
| Image name | sdcard_lost |
| Destination | Local examiner workstation |
| Case number | Customer Photos |
| Evidence number | 1 |
| Unique description | 0xG10D |
| Examiner | 0xG10D |
| Notes | 27 AUG 2026 |
Procedure
Step 1 — Start the Disk Imaging Process
I opened FTK Imager and started the option to create a forensic disk image. This begins the imaging process where the source evidence can be selected.
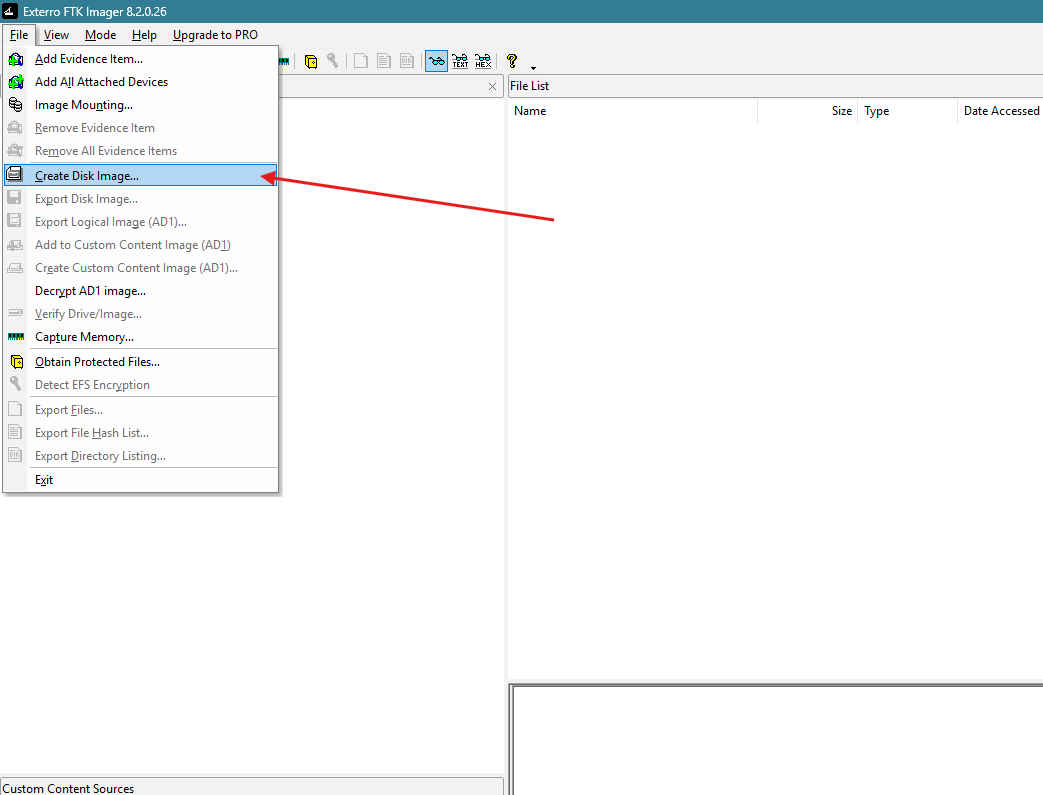
Figure 1: Starting the disk-image creation process in FTK Imager.
Step 2 — Select the Evidence Source Type
FTK Imager asked for the type of source that would be acquired. Since the evidence was an SD card connected to the computer as a storage device, I selected the physical drive option.
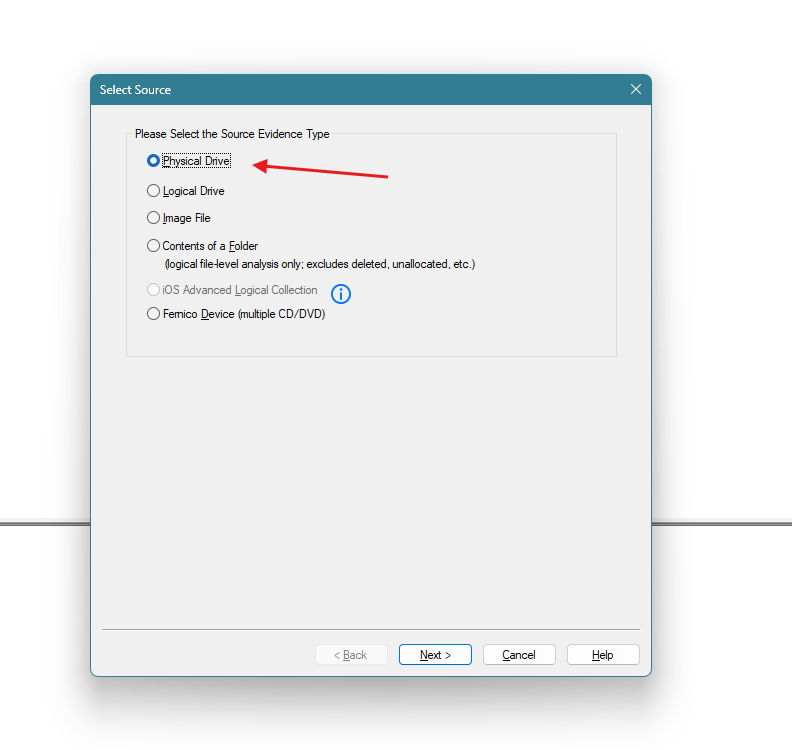
Figure 2: Selecting the source type for the forensic acquisition.
Step 3 — Select the SD Card
I selected the SD card from the available physical drives. FTK Imager identified the evidence as an SDHC SCSI Disk Device.
It is important to select the correct physical device because selecting the wrong drive would result in acquiring unrelated data.
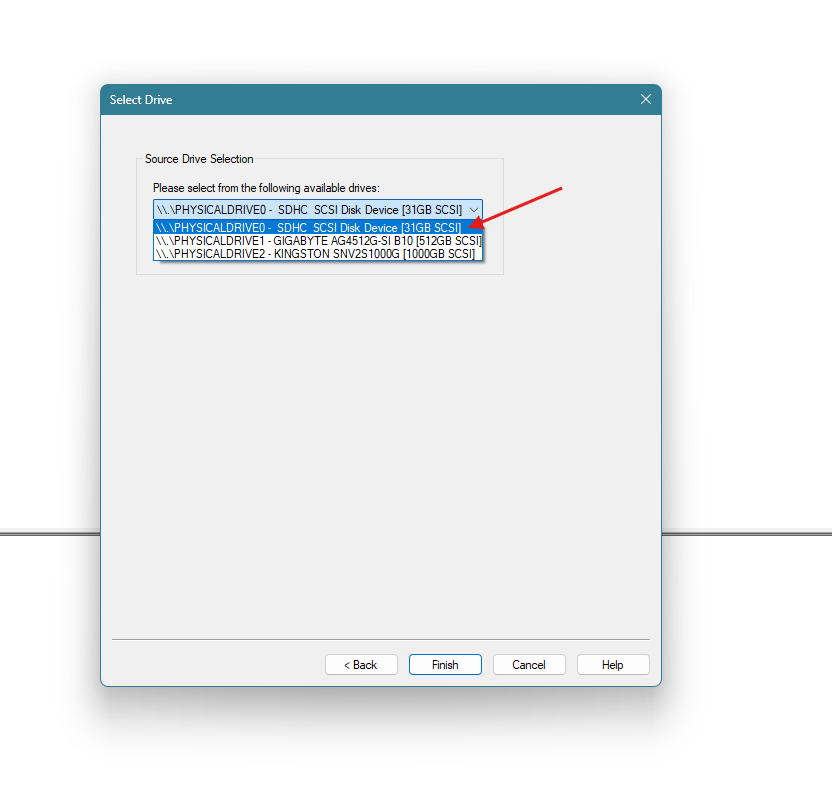
Figure 3: Selecting the SDHC physical drive as the evidence source.
Step 4 — Confirm the Source Drive
After selecting the SD card, FTK Imager displayed the selected source in the Create Image window. I confirmed that the correct physical drive had been selected before configuring the image destination.
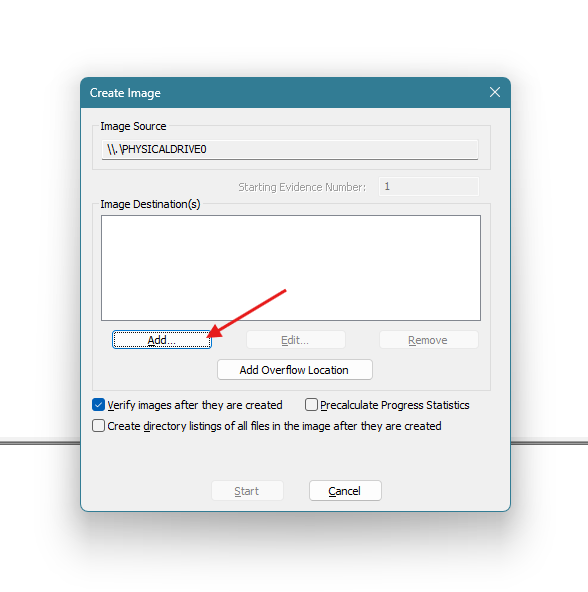
Figure 4: Confirming the selected physical evidence source.
Step 5 — Select the Forensic Image Format
For the destination image type, I selected E01. This format allows the acquisition to be stored as a forensic evidence image together with case and integrity information.
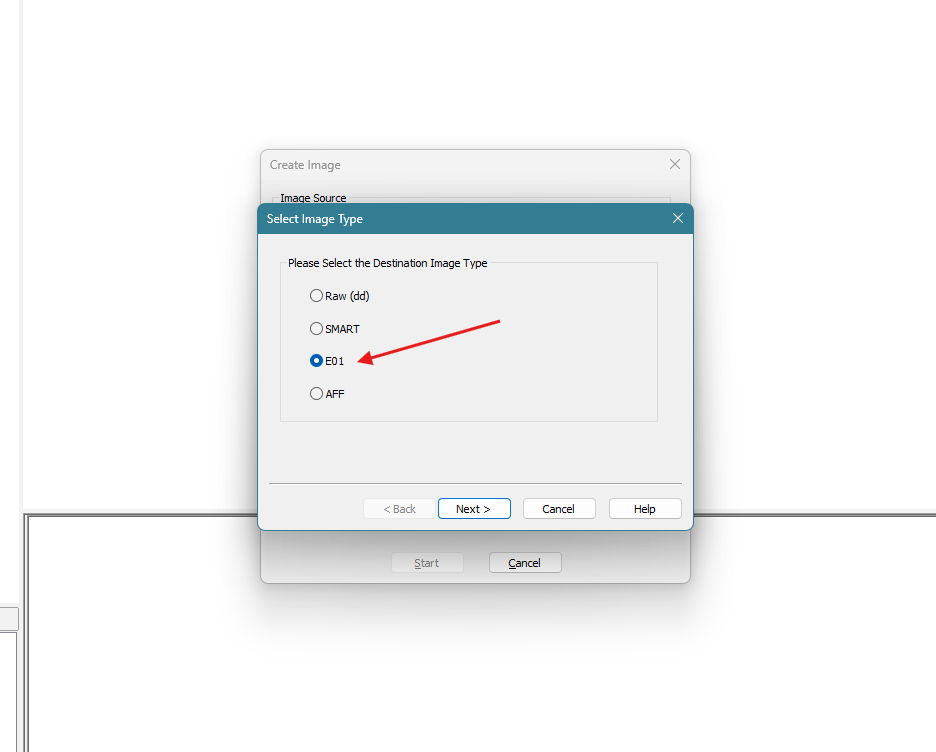
Figure 5: Selecting E01 as the forensic image format.
Step 6 — Enter Evidence Information
I entered the case and examiner information that would be associated with the forensic image.
The information used was:
-
Case Number:
Customer Photos -
Evidence Number:
1 -
Unique Description:
0xG10D -
Examiner:
0xG10D -
Notes:
27 AUG 2026
Recording this information helps document who performed the acquisition and identifies the evidence being processed.
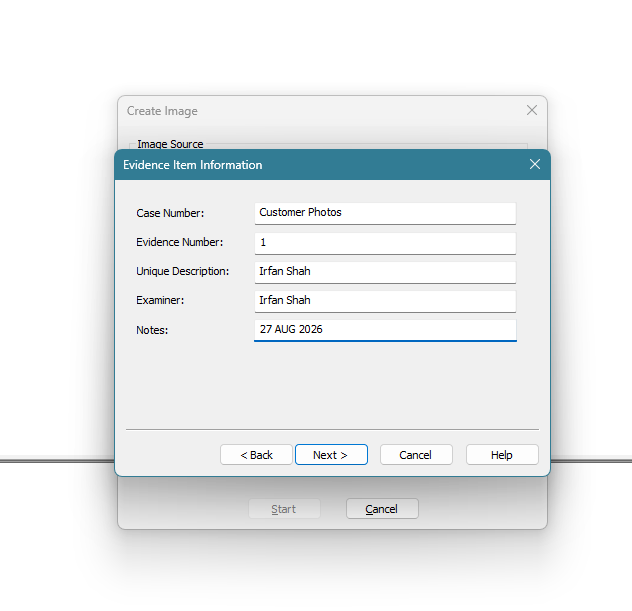
Figure 6: Entering case and evidence information for the acquisition.
Step 7 — Configure the Image Destination
Next, I configured the location and filename for the forensic image.
The image was saved to:
<examiner-workstation>\Downloads\The image filename was set to:
sdcard_lost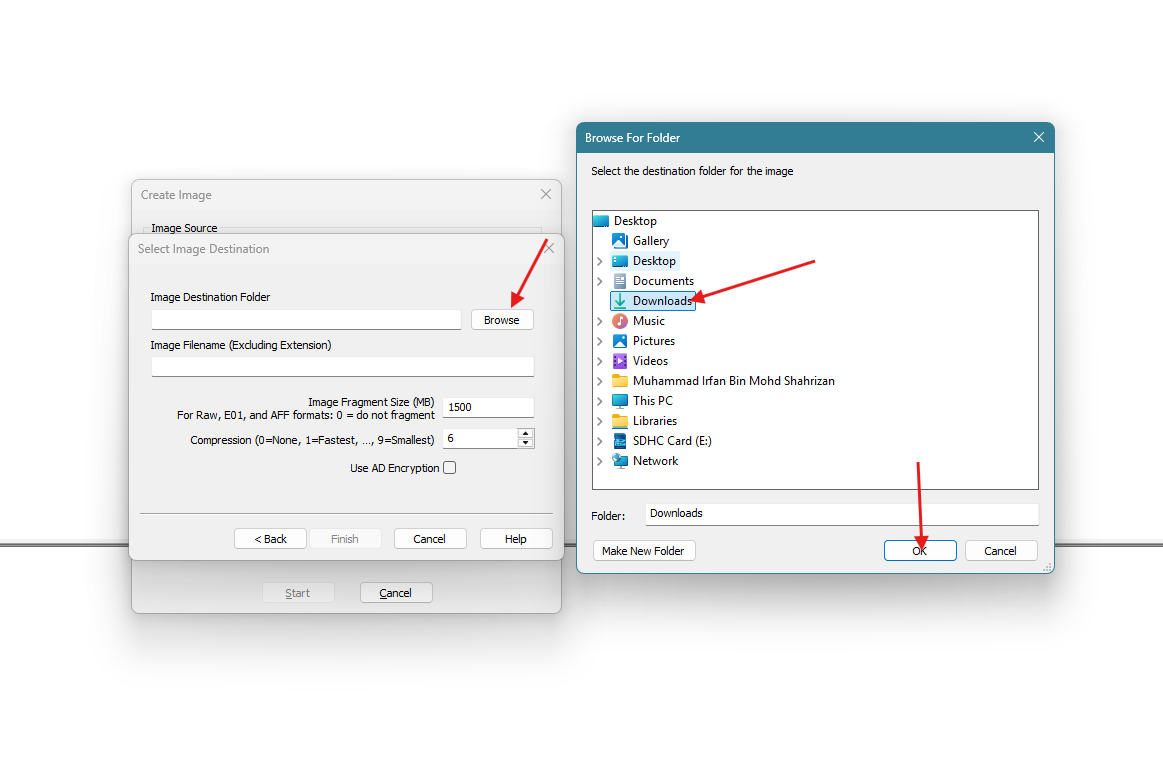
Figure 7: Configuring the destination and filename for the E01 image.
Step 8 — Review the Acquisition Configuration
The configured image destination was added to the imaging task. I reviewed the selected source and destination settings before beginning the acquisition.
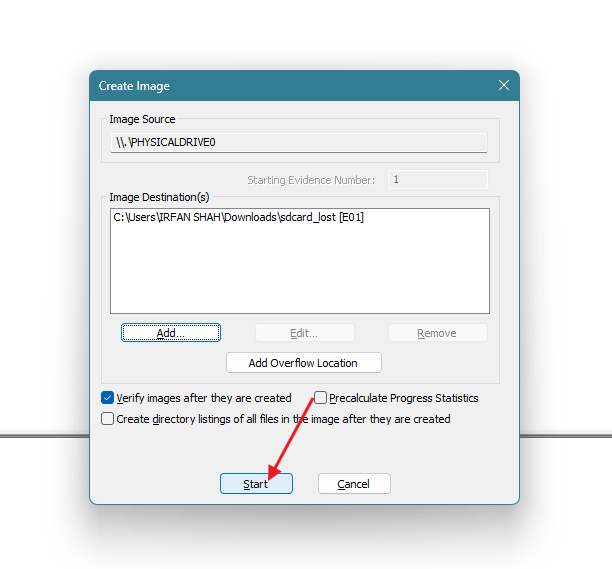
Figure 8: Reviewing the configured forensic-image destination before acquisition.
Step 9 — Start the Acquisition
I started the imaging process. FTK Imager began reading the SD card and writing its contents into the E01 forensic image.
The acquisition started at:
Thu Aug 27 10:47:37 2026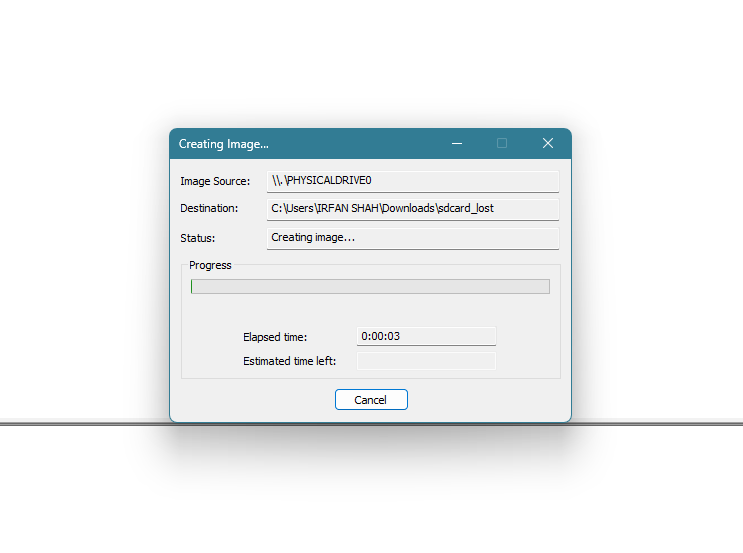
Figure 9: FTK Imager acquiring the contents of the SD card.
Step 10 — Acquisition Completed
The acquisition finished at:
Thu Aug 27 10:58:03 2026FTK Imager calculated the following hashes for the acquired evidence:
MD5  : 6827dff2c8f08cdcf3e3994e4f62065a
SHA1 : d62fd41795d7600309ee55efcac7e5d8bb3d481b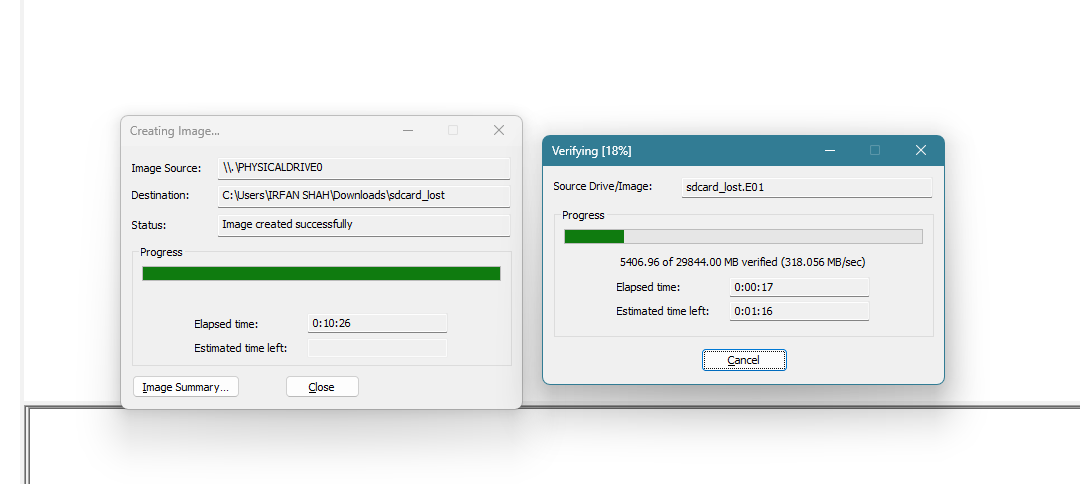
Figure 10: Completion of the forensic-image acquisition.
Step 11 — Verify the Forensic Image
After acquisition, FTK Imager performed image verification. Verification started at 10:58:03 and finished at 10:59:27 on 27 August 2026.
The verification results were:
| Hash | Value | Result |
|---|---|---|
| MD5 | 6827dff2c8f08cdcf3e3994e4f62065a | Verified |
| SHA1 | d62fd41795d7600309ee55efcac7e5d8bb3d481b | Verified |
Both hashes were successfully verified. This confirms that the hash values calculated during verification matched the values calculated during acquisition.
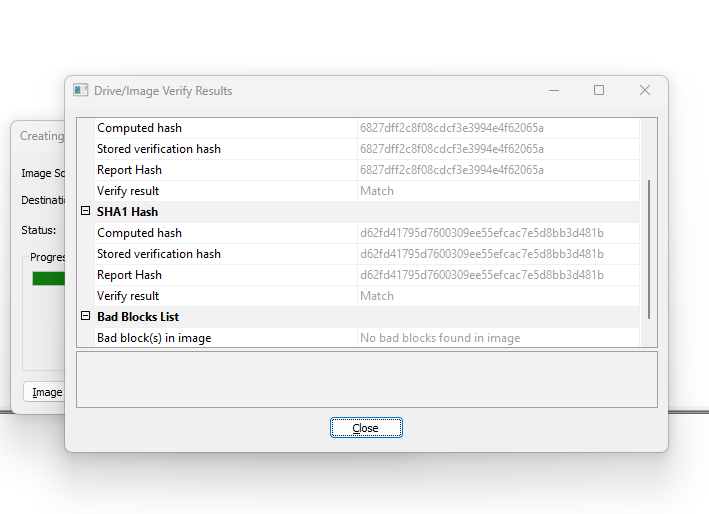
Figure 11: Successful MD5 and SHA1 verification of the forensic image.
Step 12 — Confirm the Generated E01 Files
The completed forensic image was stored as multiple E01 segments. FTK Imager generated the following files:
sdcard_lost.E01
sdcard_lost.E02
sdcard_lost.E03
sdcard_lost.E04
sdcard_lost.E05
sdcard_lost.E06
sdcard_lost.E07
sdcard_lost.E08
sdcard_lost.E09
sdcard_lost.E10
sdcard_lost.E11
sdcard_lost.E12
These segments together represent the complete forensic image of the SD card.
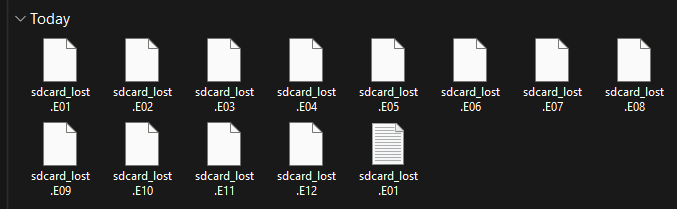
Figure 12: E01 image segments created after the acquisition.
Acquisition Summary
FTK Imager recorded the source as a physical SDHC SCSI Disk Device with a source size of 29,844 MB and 61,120,512 sectors.
The acquisition created an E01 image divided into twelve segments from sdcard_lost.E01 to sdcard_lost.E12.
Acquisition Timeline
| Event | Date and Time |
|---|---|
| Acquisition started | 27 Aug 2026, 10:47:37 |
| Acquisition finished | 27 Aug 2026, 10:58:03 |
| Verification started | 27 Aug 2026, 10:58:03 |
| Verification finished | 27 Aug 2026, 10:59:27 |
Integrity Results
MD5  : 6827dff2c8f08cdcf3e3994e4f62065a : verified
SHA1 : d62fd41795d7600309ee55efcac7e5d8bb3d481b : verified
The successful verification shows that the forensic image was created consistently and is suitable to be used as the working evidence for the next stage of the investigation.
Forensic Significance
Creating an image before attempting deleted-file recovery is important because the original SD card should be preserved as evidence. Analysis can then be performed on the forensic image rather than repeatedly accessing the original storage device.
For this PBL, the resulting forensic image will be used as the evidence source for the deleted-file recovery demonstration.
The workflow is:
Original SD Card
      ↓
FTK Imager Acquisition
      ↓
sdcard_lost.E01–E12
      ↓
Hash Verification
      ↓
Deleted-File Recovery / Analysis
Conclusion
The SD card was successfully acquired using FTK Imager 8.2.0.26 as an E01 forensic image. The acquisition produced twelve image segments, and both the MD5 and SHA1 hashes were successfully verified.
The verified forensic image can now be used for deleted-file recovery and further forensic analysis while keeping the original SD card separate from the analysis process.
Related Writeups



Authorized security practice only. These notes are for lab, CTF, and explicitly permitted environments.